 | |  |
AlphaPlugins Engraver III plug-in for Adobe Photoshop | |  | |
 | | Contents |
IntroductionEngraver III plugin lets you turn any picture into an impressive old-style engraving with just a few mouse clicks. YOU are in control, just like the old masters. Edit the line widths, curve patterns, colors and tinges, add additional layers to simulate cross-hatching; even add noise and randomness to give your engraving the imperfections from an old printing press. Finish your engraving by choosing paper colors and textures.
Once you find the perfect parameters for your engravings, Engraver III lets you save your settings for the next masterpiece. |
What’s NewFaster processing:The Engraver III plugin implements a new image-processing engine, which produces high quality images faster than previous versions. The rendering engine is powerful enough to let you work in a large preview size in high resolution with no effect on performance (important on Retina screens!). | Multilayer support:The new version introduces multilayer support, which allows you to create an engraving with intersecting patterns, simulating more realistic and complex crosshatching. You can also experiment with parameters that creatively affect and blend the layers, with the results all shown in real time. | New patterns:We’ve kept all the old geometric patterns and added even more in Engraver III, giving you a unique family of engraving effects not available in any other plugin. | Randomization features:Old-fashioned engravings had imperfections, made by the engraver’s hands or by the printing process. The new randomization options let you add noise to the engraving lines, change line roughness, continuity and edges, or engraving line coverage of the image. All these imperfections make your engraving all the more unique. | Intuitive user interface:We’ve worked hard to make the user interface of Engraver III powerful and easy to understand. We’ve made the Engraver III window resizable, and the Preview pane scalable. Parameters are also conveniently grouped by themes. | Powerful presets:Engraver III’s power starts with its large set of factory parameters (grouped in subfolders for convenience). You can quickly explore plugin possibilities and features, and tune up settings as you go. And again, when you create a special setting you want to use again, it’s easy to save it! |
|
| |  | |  |
 | |  |
| Installation and Registration | |
| |  Windows Installation. Windows Installation.
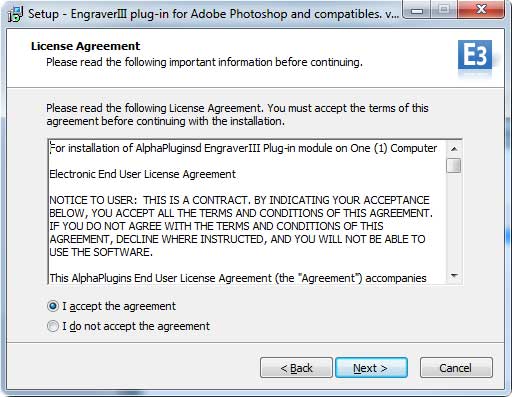
Installing Engraver III is very easy.
- Download the EngraverIIIInstaller.exe file from here.
- Launch this file and follow the instructions.
 If you have both 32bit and 64bit versions of Photoshop, then please, attend what version of plug-in you would like to install: (32bit), or, (64bit). If you have both 32bit and 64bit versions of Photoshop, then please, attend what version of plug-in you would like to install: (32bit), or, (64bit).
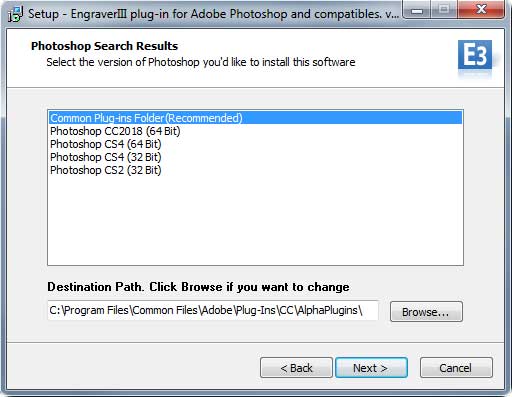
- During installation the installer will attempt to automatically detect all installed versions of Photoshop, and will offer a variant of target path. If you have a version of Photoshop Creative Cloud then you can install plug-in into a common pug-ins folder:
C:\Program Files\Common Files\Adobe\Plug-Ins\CC
In this case, you should not reinstall plug-in if you will install future Photoshop's versions. Else, you always can install plug-in into a local plug-ins folder i.e.:
C:\Program Files\Adobe\Adobe Photoshop CC2018\Plug-ins.
.
- Click the Next button, and complete the installation.
 | To install the plug-in using an image editing program other than Photoshop, please consult the plug-in installation section in the user manual for whichever editor you have chosen. |
|
 Macintosh Installation. Macintosh Installation.
When installing the Engraver III plug-in for Macintosh, our smart installer will locate the correct installation path for you — easily and automatically. - Download the EngraverIIIInstaller.zip file from here.
- then, unzip it.
- Launch the EngraverIIIInstaller application and follow the instructions.
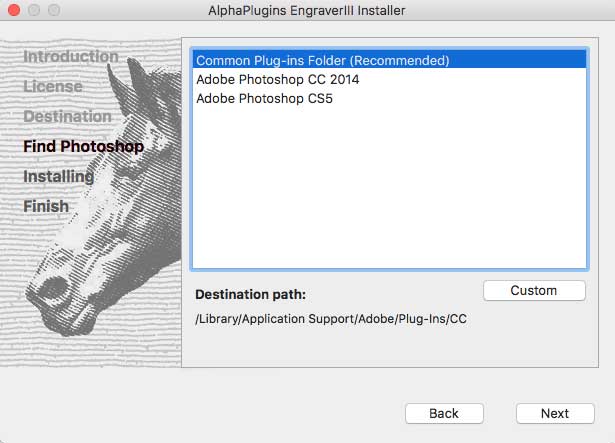
- The plug-in finds all installed versions of Photoshop. You should choose one. If you have a version of Photoshop Creative Cloud then you can install plug-in into a common
plug-ins folder:
/Library/Application Support/Adobe/Plug-Ins/CC
In this case, the plug-in will be available for all versions of Photoshop CC include future.
As variant you can install plug-in into a local plug-ins folder i.e.:
/Application/Adobe Photoshop CC2018/Plug-ins
or you can press "Custom" button and browse any other appropriate folder of your choice.
- Click the "Next" button and all the necessary files will be installed in the chosen folder.
| To install the plug-in in Adobe Photoshop Elements, locate the plug-in folder specifically for that image editor. |
|
RegistrationYou will automatically receive the serial number for your copy of Engraver III immediately following your purchase. There are two ways that you can register your copy of the Engraver III plug-in: Online, and Offline. Online Registration.If you are connected to the Internet, then Online registration is the simplest way to register your copy of plug-in. After launching Engraver III, you will see a registration dialogue box. Just select the Online registration option; insert your name; enter the serial number you received; and, click the Register button. The Engraver III plug-in will automatically connect with our registration server to complete the registration process, sending you a confirmation message that the registration of your plug-in has been successful. Then, just click the Close button — registration is complete, and you are ready to use your new Engraver III plug-in! | If you are currently operating with an Internet firewall in place, it is recommended that you switch it off temporarily during the registration process. |
Offline Registration.Even if you do not use an Internet connection with your computer, you can still register your Engraver III plug-in. You can self generate an offline answer if you use this form or contact us to obtain an offline answer (for the Offline registration process) if you cannot connect to the Internet — or if you are determined to keep your photo-editing computer isolated from any direct connection with the Internet. The Offline Registration Number is a numerical ID which will be valid for a few days: to complete your registration, just select the Offline option in the registration dialogue box; insert your Name, Serial Number, and Offline Answer; then click Register to complete the registration process, and Close the registration dialogue window. | Remember: Per one serial number You can register so number of plug-in instances as number of licenses you purchased. I will however allow an extra registration for each plug-in serial number, so that users can install Engraver III on, for instance, both their desktop and laptop computers. |
|
 | Engraver III is a plug-in that works on much more than just Adobe Photoshop! Our software enables you to launch this plug-in (and many others) using graphic image editing programs that do not normally support Adobe Photoshop plug-ins. So, even if you do not have Adobe Photoshop on your computer, you can still launch Photoshop plug-ins — using AlphaPlugins LaunchBox! By using LaunchBox, you can run a range of Photoshop plug-ins (including Engraver III) using applications such as Adobe Lightroom, iPhoto, Aperture, and many others. You can start running Engraver III right out of the LaunchBox no matter what image editing software you are currently using! |

| |  | |  |
| | |
| Quick Start | |
| |
Launch Photoshop, and open a picture that is 8bits per channel in either RGB or CMYK mode. Pull down the Filter menu and choose the Alpha Plugins > Engraver III menu item.
| If you haven’t yet registered the plugin, please register it now. If you don’t register you can use the plugin in trial mode for 14 days. |
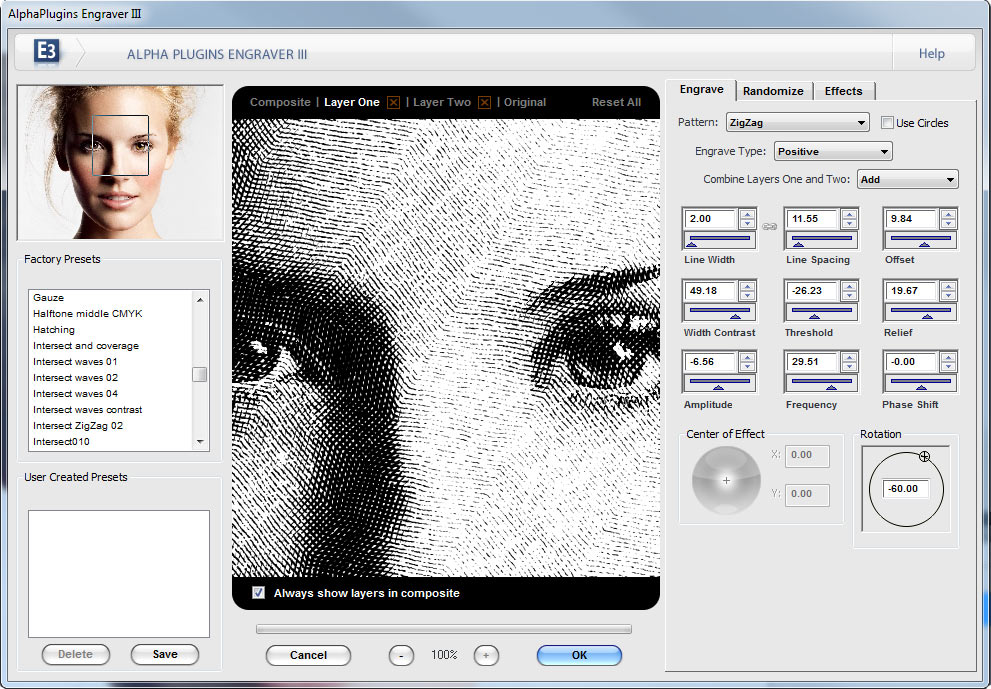
Engraver III WindowYou can resize the Engraver III window as needed. Resizing the window also resizes the preview area. You can increase or decrease preview scale by pressing: or or  buttons below the preview pane buttons below the preview pane- Ctrl (Cmd on Mac) “+” and “-” keys
- Ctrl (Cmd) + “0” or “1” keys
To change the area shown in the preview pane, look at the small picture in upper left, and move the small square to a different area on the image. Or just drag the preview area with holding left mouse button
Factory Preset AreaAt left side of window you can see a list with factory presets. You can apply a preset from this list to quickly explore plug-in features. In bottom list you can save your own favorite parameter settings.
Engraving ControlsAt right side of the window you can see all the engraving controls, grouped under three tabs. (See the following Filter Parameters section for detailed explanation of filters). - Engraver – the main engraving feature parameters
- Randomize –parameters that add more of a hand-made look to your engraving
- Effects – parameters for colors, papers and stamping effects
Parameter Values and Default Ranges Note that some controls have blue digits, and some black (on Windows, all digits are black, but have blue or black borders on the sliders.
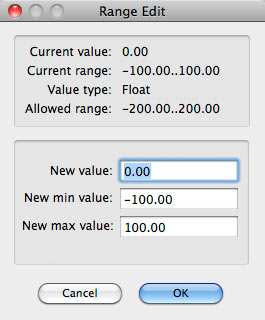
Black digits/borders mean that the default ranges of the parameters are fixed. Blue digits/borders mean that you can alter the default ranges. Right click (or Ctrl + click on Mac) over the slider area and a special dialog box appears to allow you to alter the default parameter ranges. 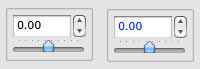
|  |
Multilayer SupportAt the top of the preview window you will see several commands:  . Use these commands to make a multilayered engraving composition and adjust how the layers interact. Click Add Layer to add a second engraving layer to the picture (this becomes the active layer). To see the result, click Composite or check the box for Always show layers in composite under the Preview pane.
Select either Layer One or Layer Two to activate the layer and make it editable. To delete a layer, click the small red . Use these commands to make a multilayered engraving composition and adjust how the layers interact. Click Add Layer to add a second engraving layer to the picture (this becomes the active layer). To see the result, click Composite or check the box for Always show layers in composite under the Preview pane.
Select either Layer One or Layer Two to activate the layer and make it editable. To delete a layer, click the small red  to the right of the layer name. to the right of the layer name.
When You’re FinishedWhen you finish setting parameters. Click the OK button, or click Cancel to exit without applying filters.
|
| | | | |
| | |
| Filter Parameters | |
| |
All filter parameters are grouped into three tabbed windows for convenience.
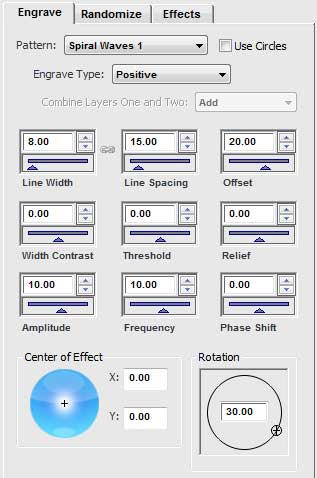
Engrave TabThe Engrave tab contains basic parameters for the engraving process.
- Pattern – the list of adjustable geometric patterns in the engraving layer.
- Use Circles – draws geometric patterns with docs, giving the appearance of a halftone print.
- Engrave Type –determines how the source picture intensity should be interpreted (positive, negative, or combined)
- Combine Layers One and Two – when using two engraving layers, this option determines the interaction between engraving layers.
- Line Width –thickness of engraving lines.
- Lines Spacing – spacing between engraving lines.
 – this button is available only when Use Circles mode is on. It binds horizontal and vertical spaces between dotted elements. – this button is available only when Use Circles mode is on. It binds horizontal and vertical spaces between dotted elements. - Offset – this option shifts patterns, or ink plates when a multicolor palette is used.
- Width Contrast – increases or decreases line width depending on initial picture intensity. Decreases line width and increases line space if Engraving Type setting is “Negative.”.
- Threshold – another way to adjust dependence of line widths and initial picture intensity. If this parameter value is -100 then line width is not dependent on initial picture intensity.*
* if you choose “Negative” in Engrave Type menu, then the two previous parameters can work in reverse.- Relief – sets up additional random geometry distortion depending on initial picture intensity.
- Amplitude –sets amplitude of waves.
- Frequency – the frequency of patterns, waves or zigzags.
- Phase Shift – shift of phase for patterns, waves or zigzags.
- Center of Effect – this shade sphere control determines the center of some geometric patterns. Also, you can adjust this parameter directly in preview by moving a crosshair mark with mouse and right button holding in preview window (Cmd+ click in Mac).
- Rotation – defines the angle a geometric pattern is rotated.
|  |
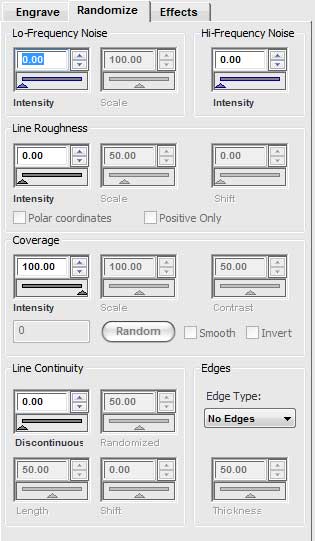
Randomize Tab- Lo-Frequency Noise – these options add low-frequency noise to engraving lines.
- Intensity –value of random distortion.
- Scale –size of distortion.
- Hi-Frequency Noise – adds high-frequency noise to engraving lines.
- Intensity –value of random distortion.
- Line Roughness – these options add random noise to line widths. Unlike the previous groups these parameters don’t distort geometric curves, but apply noise to curve widths.
- Intensity –value of noise pattern.
- Scale – size of noise pattern.
- Shift – offset of noise pattern.
- Polar Coordinates –calculates noise pattern in polar coordinates. It affects certain engraving patterns like rings, helixes, etc. (available when using radial patterns like rings and spirals).
- Positive Only – applies width noise only as positive (available when Intensity is > 0).
- Coverage – these options determine how the engraving pattern randomly covers a picture.
- Intensity – intensity of coverage. For example, 100 = engraving pattern fully covers picture, 0 = pattern doesn’t completely cover picture. Note: the following options are not available unless Intensity is less than 100.
- Scale – size of coverage pattern.
- Contrast – contrast of coverage field edges.
- Random – clicking this button generates a random coverage setting.
- Smooth –whether coverage field edges are smooth or carved.
- Invert – inverts the coverage pattern. You can use this option to create an interesting effect with two layers. Set the same coverage pattern to both, but sets one layer to Invert.
- Line Continuity – these options add a randomly discontinuity to engraving curves.
- Discontinuous – value of discontinuity. If the value is 0, lines are continuous. As values move towards 100, lines break up and start to disappear.
- Randomized – whether discontinuity is regular (0 = all line segments and spaces have similar length) or random (> 0 = line segments and spaces are random).
- Length – lengths of segments.
- Shift – offset for discontinuity pattern.
- Edges – these options add noise artifacts on curve edges and make compositions looked more realistic.
- Edge Type – type of edge effect.
- Thickness – thickness of edge effect.
|  |
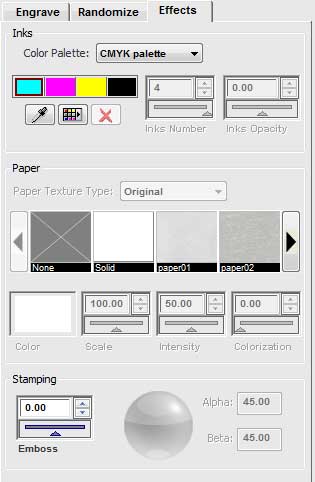
Effects TabThis tab contains parameters responsible for final decoration of engraved composition. Here you can play with ink colors, papers and a stamp pressure.
- Inks – these options define the colors used in engraving patterns.
- Color Palette – a menu of different color palettes. Below the menu is a control element that shows colors currently in use.
 picks up a color from anywhere onscreen. picks up a color from anywhere onscreen.  launches the color picker dialog. Can also launch the color picker by double clicking on the color rectangles below the Color Palette menu. launches the color picker dialog. Can also launch the color picker by double clicking on the color rectangles below the Color Palette menu.  deletes the currently active color from palette. deletes the currently active color from palette. - Inks Number – number of inks used in custom palette.
- Inks Opacity – opacity of inks (especially important when using papers).
- Paper – these options configure paper colors and textures.
- Paper Texture Type –defines how to interpret initial paper texture.
- Papers thumbnails palette – filmstrip of available paper textures. All papers presented here were found in open public resources and aren’t copyrighted. You can add your own paper textures. To do this, place your texture image files into subfolder:../AlphaPlugins/EngraverIII/Papers).
- Color – when Paper Texture Type is Surface or Colorized, color picker becomes available to choose a paper color.
- Scale – when a paper texture is selected, defines the scale of paper texture.
- Intensity – the intensity of paper texture.
- Colorization – how the paper texture blends with custom colors.
| Intensity and Colorization options can only be used with Paper Texture Type of Surface or Colorized. |
- Stamping – these options configure a stamping effect for the engraving lines to simulate a printing press.
- Emboss –depth of the emboss effect (if value is >0), or deboss effect (if value is <0).
- Stamping direction – direction of embossing pressure (click and drag circle on shade sphere or enter parameters in the two fields).
|  |
|
| | | | |
| | |
| Conclusion | |
| |
Engraver III is a unique and powerful tool that lets you create complex and beautiful engravings with just a few clicks without special skills or knowledge.
|
| | | | |
| | |
| System Requirements | |
| |
Windows
- Windows OS 95-2000, XP(32/64Bit), Vista (32/64Bit), Windows 7, Windows 8, 10, 11 or later
- 1.2 GHz processor or higher
- At least 256 megabytes of RAM or more
- Graphics card 16-bit color, and 256MB of VRAM or higher
- 1024 x 768 display or bigger
- Adobe Photoshop CS5 - CC2024 or later
|
| | | | |
Copyright, 2023, AlphaPlugins, LLC.
Author: Maxim Chernousov.
You can find more information about EngraverIII plug-in. Please, visit EngraverIII's product page on our site. There you can find freshest version of this product. Also you can find tutorials and samples for our products. |
|
|